Summer heat always sends us hunting for cool, satisfying homemade sweets that skip long‑hour oven baking. If you are tired of complicated cheesecake preparations, fussy ice‑cream churners and store‑bought frozen treats stuffed with artificial preservatives, then this homemade Oreo milk ice cake will become your new‑go‑to warm‑weather dessert. This silky, cookie‑crumb speckled cold cake needs no baking, only basic grocery‑store ingredients, simple stovetop stirring and several hours of refrigerator chilling. It delivers smooth, milky sweetness balanced by crunchy dark‑chocolate Oreo crumbs, and it fits perfectly for weeknight snacks, weekend family feasts, friend hang‑outs and quick party desserts.
Over the past few years, no‑bake cold desserts have taken over home‑baking social‑media trends. Modern home‑makers prioritize low‑effort recipes that call for minimal specialist kitchen gear, shorter prep time and adjustable sugar‑level options. Heavy, oven‑baked chocolate cakes feel far less appealing when outdoor temperatures soar. Cold, set‑with‑starch milk puddings and ice‑style cakes have exploded in popularity on short‑form cooking platforms, and Oreo‑infused treats consistently rank among the most searched‑for homemade snack ideas. People love the contrast between silky, tender milk curd texture and the crisp, chocolatey crunch of crushed sandwich‑cookie crumbs. This Oreo milk ice‑cake recipe hits every single one of those popular dessert trends, and it is beginner‑friendly enough even for people who have zero formal baking experience.
Let us go through the full ingredient checklist first. Every component is simple and easy to source from local supermarkets. You are going to need 500 millilitres of whole cow milk, 50 grams of fine cornstarch, 20‑gram low‑calorie sugar‑free sweetener, two fresh egg yolks, and your preferred amount of crushed Oreo cookie crumbs. One wonderful advantage with this recipe is its customizable sweetness. Using zero‑calorie sugar substitute cuts down excess refined sugar, making this chilled cake a far lighter dessert compared to rich cream‑heavy ice‑cream cakes sold at bakeries. Whole milk brings thick, rich dairy flavour, while cornstarch acts as the natural setting agent that turns runny milk mixture into firm, sliceable ice‑cake texture once chilled. Egg yolks boost silkiness and add deep, velvety mouth‑feel to every bite. You can also swap regular milk for oat milk or almond milk for a lactose‑free variation.
Now we can walk through every single straightforward cooking stage step‑by‑step. Grab a deep‑bottom cooking pot and pour all your 500 ml whole milk inside the container. Next, add your 50‑gram cornstarch powder and 20‑gram sugar‑free sweetener into the milk. Many first‑time cooks run into lumpy starch paste, so remember to stir the liquid thoroughly right now until all the cornstarch powder fully dissolves with no grainy lumps floating at the bottom of your saucepan. Lumps will ruin the silky texture of your finished Oreo milk ice cake, so never skip this initial mixing stage.
After your starch‑milk solution turns smooth, add two separated fresh egg yolks into the pan. Keep stirring the mixture well so that the yolks fully combine with your dairy liquid. Do not add egg whites in this recipe; egg whites will alter the thickening property of cornstarch and create rubbery, uneven texture inside your cold cake. Once all ingredients are well‑blended, turn your stove down to low‑heat mode. Low‑heat slow‑cooking is the most critical rule for this milk‑based dessert. High‑temperature cooking instantly burns the milk at the pan base and creates scrambled‑egg chunks out of your egg yolk. Keep using your silicone spatula to stir non‑stop as the liquid warms up.
Slowly, your runny milk mixture will begin to thicken up into thick, sticky pudding‑like paste. Continue stirring until the batter reaches a thick, slow‑flowing consistency that sticks onto your spatula. When you lift up your cooking tool, the thick paste should drip down slowly instead of running fast like water. Switch the stove‑heat off right away once you hit this texture point. Do not over‑cook the starch batter, or your final ice‑cake will turn tough and rubbery after refrigeration.
Your next fun step is stirring in crushed Oreo cookie crumbs. You can crush your sandwich cookies by hand, crush them inside sealed plastic bags, or use a food processor for fine cookie dust. Fold the cookie crumbs evenly all through your thick warm milk paste. Do not over‑stir, or your Oreo pieces will break down into completely fine dust and lose that satisfying crunchy contrast against soft milk paste. You can reserve a small portion of coarse cookie crumbs for your top garnish later on.
Now prepare a round‑shaped container or cake mould for shaping your ice cake. You can use regular plastic food‑storage bowls, glass baking containers or silicone cake moulds for simple demoulding later on. Pour your warm Oreo‑studded thick batter evenly into your mould, then tap the container several times against your countertop. Tapping knocks out trapped air bubbles so your finished cake will not contain unwanted hollow air pockets.
Put the uncovered container inside your refrigerator and allow the mixture to chill and solidify for no less than four hours. For the firmest, easiest‑to‑slice texture, many home‑cooks prefer leaving their Oreo milk ice cake to chill overnight inside the fridge. This long cooling‑down process lets cornstarch complete its starch‑gelatinization process and turns loose batter into firm, slice‑able chilled cake.
Once your four‑hour cooling time runs out, you can begin the fun demoulding work. Run a thin butter knife carefully along the inner edge of your mould to loosen the sticky milk‑cake sides. Flip the whole container upside‑down over your serving plate and tap the mould’s bottom gently. Your complete round Oreo milk ice cake will slide out neatly on‑to the dish. Finish your dessert by dusting the top surface generously with leftover crushed‑Oreo powder. You are also free to decorate with whole Oreo biscuits, whipped‑cream swirls or chocolate drizzle if you are making the treat for parties.
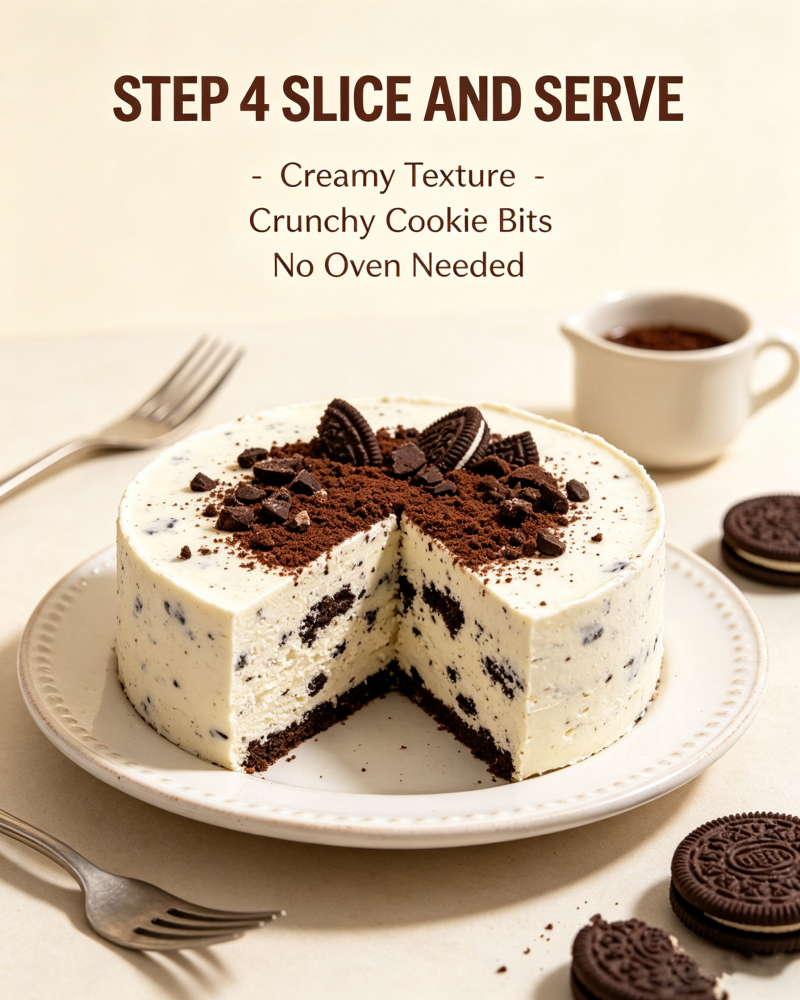
Cut your set cold cake into triangular slices just like you would slice a traditional round birthday cake. Every single bite brings amazing layered sensory enjoyment: soft, bouncy, silky milk‑pudding base with tiny crunchy Oreo fragments scattered all over the interior. The low‑sugar formula keeps the sweetness gentle and creamy instead of cloyingly rich. It tastes refreshingly cool on hot summer afternoons, and the texture sits somewhere between milk jelly, soft pudding and no‑bake cheesecake.
One huge benefit of this Oreo milk ice‑cake recipe is its incredible adaptability for different taste preferences and dietary‑restriction needs. If you love strong chocolate flavour, you can stir cocoa powder into your milk batter while heating. Fruit lovers can toss crushed strawberry or mango pieces alongside the Oreo crumbs. People watching daily sugar intake can stick to the zero‑calorie sweetener setting, while fans of classic sweet flavour can replace sugar‑free sweetener with regular white granulated sugar. For vegan‑friendly adjustments, remove egg yolks, swap dairy milk for plant‑based milk and double‑check that your sandwich cookies contain no animal‑derived ingredients.
When we look closely at current global home‑dessert trends in 2026, no‑bake refrigerator sweets keep rising in popularity for very understandable reasons. Modern‑day home cooks are busier than ever before. Few people wish to spend hours monitoring oven temperatures and cleaning piles of messy bake‑ware after work. Cold‑set starch‑based desserts need zero oven time, minimal equipment, and flexible chilling timelines. Cookie‑crumb infused puddings and ice‑style cakes dominate dessert reels on social‑media platforms, as food‑content creators constantly share quick, visually‑stunning cold treats. This Oreo milk ice cake looks gorgeous when sliced into wedges, with dark cookie specks spread all through the pale creamy‑yellow milk body, making it ideal for eye‑catching homemade‑dessert photos.
This snack also works wonderfully for many different life scenarios. Prepare a batch ahead of time for weekend family movie nights, cut slices out for quick post‑work sweet snacks, serve portions at casual summer backyard gatherings or pack small servings as lunchbox cold treats for grown‑ups. Unlike store‑bought ice‑cream cakes that quickly melt at room‑temperature, your homemade Oreo milk ice cake holds its shape well when taken out of the fridge for short periods. It will not turn runny and messy within minutes, which makes serving extremely stress‑free.
Several handy cooking hacks will help new home‑bakers avoid common beginner mistakes. Always stir continuously on low heat when heating the milk‑starch mixture; stopping stirring creates burnt‑on milk layers on your saucepan base and grainy lumpy batter. Do not rush your four‑hour refrigerator chill‑time. If you take the cake out too early before starch fully sets, your dessert will remain runny and unable to hold clean‑cut slices. Silicone cake moulds deliver the easiest demoulding results, yet regular glass bowls also perform well when you run a knife along the bowl’s rim first. Keep leftover Oreo milk ice cake sealed and stored inside your refrigerator and consume it within three days for optimum fresh texture and flavour.
Final
To wrap everything up, this straightforward Oreo milk ice‑cake recipe represents everything people adore about modern homemade cold desserts: cheap everyday‑sourced ingredients, zero oven baking, fast active‑prep time, customizable sweetness, and that iconic winning flavour pairing of creamy milk and crunchy chocolate sandwich‑cookie crumbs. Whether you are a complete cooking novice searching for your first impressive homemade sweet treat, or an experienced home‑baker hunting for new summer‑time no‑bake dessert inspiration, this chilled milk cake will satisfy your sweet‑tooth again and again. Next time hot weather arrives and you crave a cool homemade snack, gather your simple ingredients, follow our step‑by‑step guide and whip‑up your very own crowd‑pleasing Oreo milk ice cake.