Bake Perfect Sponge Cakes in 4 Simple Steps with a Round Silicone Baking Pan
Home baking has never been more accessible, especially when you use high-quality bakeware to eliminate common baking frustrations like sticking, uneven baking, and broken cake layers. This step-by-step guide will walk you through making fluffy homemade cake in just four easy stages, share critical baking precautions, and break down why a reinforced round silicone cake pan is a game-changer for both beginner and experienced bakers.
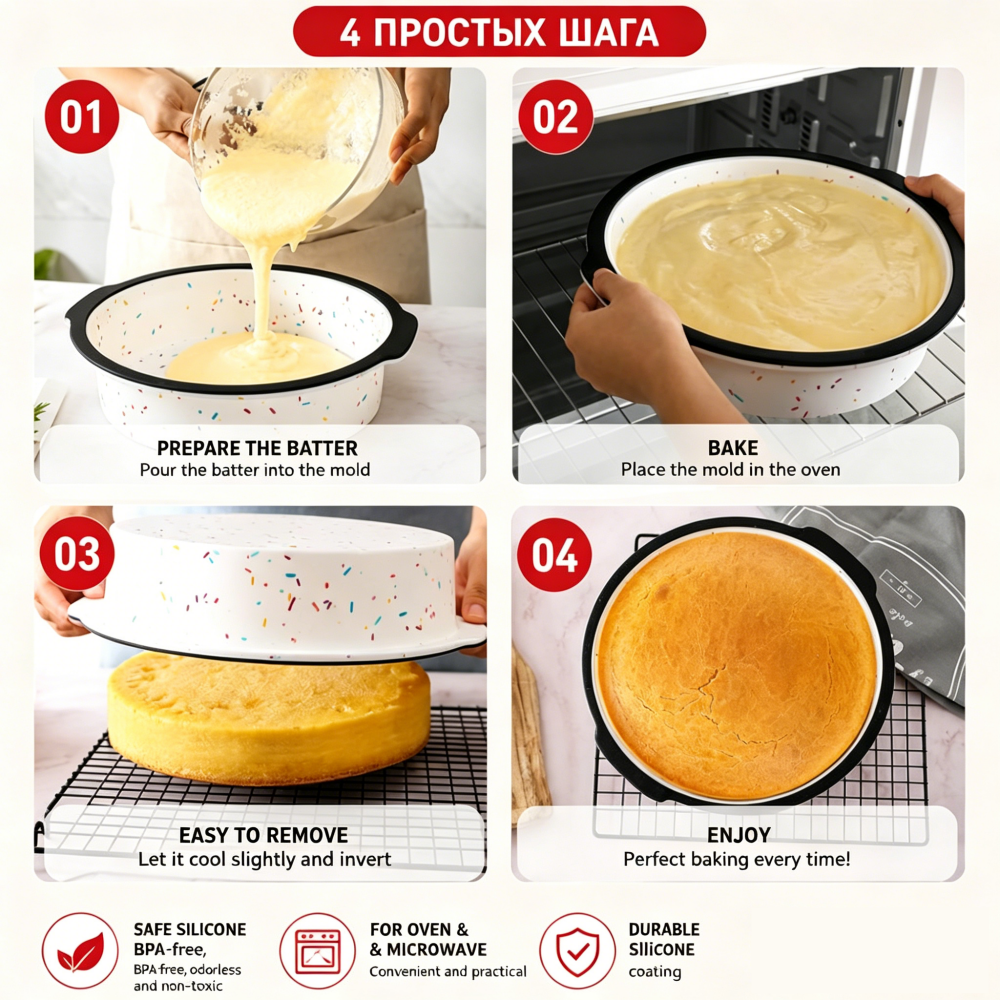
Step 1: Prepare Smooth, Lump-Free Cake Batter
The foundation of a perfect cake starts with well-mixed batter. First, gather your raw ingredients: all-purpose flour, granulated sugar, fresh eggs, milk, melted butter, and baking powder. Separate egg whites and yolks to achieve a light, airy crumb. Beat egg yolks with sugar until the mixture turns pale yellow and thick enough to leave a slow-dissolving ribbon. Stir in melted butter and milk, then sift dry flour and baking powder into the wet mixture. Gently fold the batter with a silicone spatula instead of stirring vigorously, which avoids knocking out trapped air.
Key Precaution: Never overmix the batter. Over-stirring develops gluten, which turns soft sponge cake dense and tough. Stop mixing the moment you no longer see dry flour streaks. At this stage, lightly wipe the interior of your silicone pan with a thin layer of butter. Even non-stick silicone benefits from light greasing for ultra-smooth cake release later. Fill the mold only two-thirds full to leave space for the batter to rise in the oven. Overfilling will cause overflow and uneven cake tops.
Step 2: Bake Evenly in a Preheated Oven
Before placing the pan inside, preheat your oven to 170°C (340°F) for 15 full minutes. Consistent oven temperature prevents lopsided or undercooked cake centers. Place the silicone pan on a rigid baking sheet before sliding it onto the middle rack. This solves the biggest weakness of flexible silicone: sagging under the weight of liquid batter.
Critical Baking Notes: Do not open the oven door during the first 25 minutes of baking. Sudden temperature drops will make the cake sink in the middle. Bake for 35 to 45 minutes total. Test doneness by inserting a toothpick into the cake center; if it comes out clean with only a few dry crumbs, the cake is ready. If wet batter sticks to the toothpick, extend baking time in 5-minute increments. The high heat resistance of premium food-grade silicone makes this pan stable at temperatures up to 230°C, so it will not deform or release harmful chemicals during long baking cycles.
Step 3: Cool and Release the Cake Without Breakage
This is where silicone bakeware outperforms traditional metal pans. Once you pull the pan out of the oven, let it rest on a cooling rack for 10 to 15 minutes. Do not flip the cake while it is piping hot; the soft crumb will collapse. After partial cooling, flip the entire silicone pan upside down. Gently peel back the flexible silicone walls from the cake’s edge, then roll the mold away from the cake base. The non-stick silicone surface lets the cake slide free with zero tearing or stuck residue.
Pro Tip: If you plan to layer and frost the cake, let it cool fully to room temperature before removal. For ultra-clean edges, chill the cake in the refrigerator for 1 hour first. The firm texture keeps the cake intact as you separate it from the mold. Unlike rigid metal pans, you never need to pry or scrape the cake free, which preserves the smooth surface for decorating.
Step 4: Enjoy Your Uniformly Baked Homemade Cake
Once fully cooled, your cake will have a flat, even top and golden-brown crust all around. The reinforced silicone pan distributes oven heat evenly across the entire cake surface, eliminating the problem of burnt edges and raw centers common with thin metal bakeware. You can slice, frost, and serve immediately, or store leftover cake directly in the cleaned silicone pan. This mold is also microwave and freezer safe, so you can reheat leftover cake or freeze unbaked batter without switching containers.
The Key Role of the Reinforced Round Silicone Baking Pan
Most baking failures stem from low-quality pans, and this BPA-free silicone pan solves nearly every common problem home bakers face.
-
Non-Stick & Damage-Free Cake ReleaseFood-grade silicone forms a naturally non-stick surface. No more scrubbing stuck cake residue off metal pans. The flexible structure lets you turn the mold inside out, so every cake pops out whole without crumbling. This feature alone cuts down baking cleanup time by more than half.
-
Stable Structure with a Reinforced Metal FrameThin flimsy silicone molds sag and spill batter when carried to the oven. This pan has a built-in rigid metal frame around the rim and two sturdy side handles. The shape stays perfectly round even when full of liquid batter, and the insulated handles let you lift the hot pan out of the oven without oven mitts slipping.
-
Wide Temperature CompatibilityThis pan withstands temperatures from -40°C to +230°C. It works seamlessly in conventional ovens, microwaves, refrigerators, and freezers. You can bake cake, freeze fruit jelly, reheat baked treats, and make frozen desserts all in the same single pan. It contains no BPA or toxic additives, so no unpleasant plastic odors seep into your food even under high heat.
-
Long-Lasting & Dishwasher-Safe DurabilityThe thick silicone coating resists tearing, cracking, and discoloration after hundreds of baking sessions. Once finished baking, simply rinse the pan under warm water or toss it into the dishwasher. It will not rust, warp, or develop sticky residue like metal and non-stick coated pans.
-
Even Heat Distribution for Consistent ResultsTraditional metal pans have hotspots that burn cake edges. The thick silicone material spreads oven heat slowly and uniformly across the entire cake base. Every cake you bake will have consistent color and thickness, whether you are making plain sponge cake, apple pie, or layered birthday cake.
Essential General Baking Precautions for Better Results
Even with the best silicone pan, follow these rules to avoid baking mishaps:
- Always preheat the oven fully. Cold ovens make cake rise unevenly.
- Fill silicone molds only two-thirds full to prevent overflow during rising.
- Always set the silicone pan on a solid baking tray before moving it to the oven. Never carry a full silicone pan by just the handles.
- Avoid sharp metal utensils inside the pan; silicone tools will keep the non-stick surface intact for years.
- Let baked goods partially cool before demolding. Hot cake crumb is too soft to hold its shape.
- Do not cut baking time drastically when switching from metal pans to silicone. Add 5–10 minutes to the original recipe bake time, as silicone heats slower than aluminum.
Final Words
Baking perfect cake no longer requires professional skill, just reliable bakeware and a simple four-step workflow. This round silicone cake pan turns tricky sponge baking into a straightforward process, from pouring batter to popping out a perfectly intact cake. With zero sticking, even heating, and easy cleanup, it is an essential upgrade for every home baker’s kitchen. Whether you bake weekly for family meals or make desserts for parties, this mold delivers consistent, beautiful results every single time.