Step 1: Prepare Batter & Pour into the Silicone Chiffon Cake Mold
Before mixing your cake batter, double-check your silicone chiffon cake mold. Made of food-grade flexible silicone, this oven-safe chiffon cake mold requires no heavy greasing for most recipes, thanks to its built-in non-stick surface. Wipe the interior lightly with a dry cloth to remove dust, then slowly pour your well-stirred chiffon batter into the mold. Tilt the mold gently and tap it lightly on the countertop several times to release trapped air bubbles inside the batter. This simple trick prevents large holes and uneven textures on your finished cake. The curved swirl design of the mold will shape your cake into an elegant decorative ring once baked.
Step 2: Put the Heat-Resistant Chiffon Cake Mold into the Oven
Transfer the filled silicone chiffon cake mold carefully onto the middle rack of your preheated oven. One core advantage of this oven-safe chiffon cake mold is its outstanding heat resistance. It evenly distributes heat all over the cake body without warping, unlike thin metal pans that create burnt edges. Preheat your oven to the standard chiffon baking temperature of 160°C–170°C in advance. Do not place the mold too close to heating tubes, as the wide heat-resistant range of the silicone avoids deformation even under consistent high baking heat.
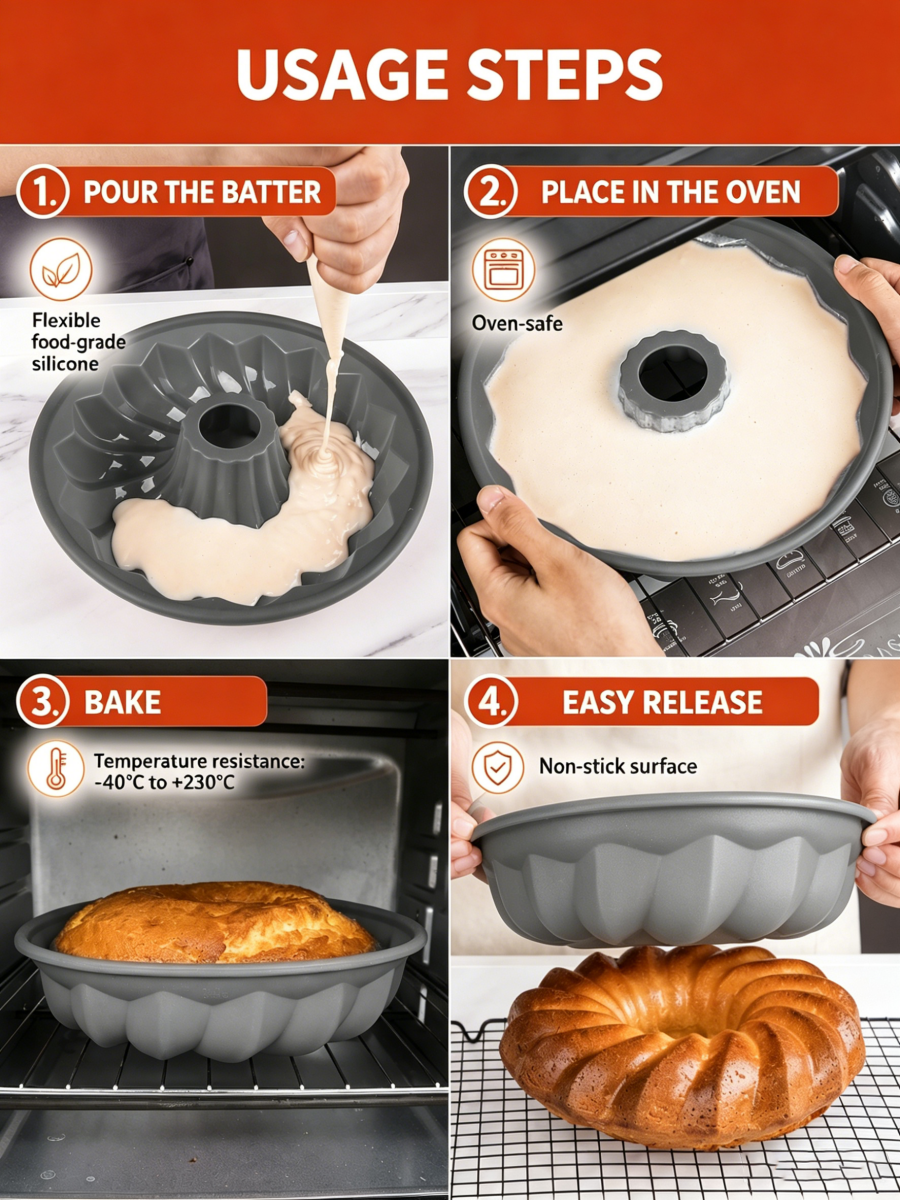
Step 3: Bake the Chiffon Cake Fully
Close the oven door and start the baking timer according to your batter volume, usually 40 to 50 minutes for a full-size ring chiffon cake. The heat-resistant chiffon cake mold holds its shape steadily throughout the whole baking cycle. Halfway through baking, avoid opening the oven frequently, as sudden temperature drops will make the cake shrink. You can test doneness by inserting a toothpick into the cake’s center; if it comes out clean with no wet batter attached, the chiffon cake is fully cooked. The silicone material insulates heat moderately, so your cake will rise evenly without collapsing around the central hollow column of the mold.
Step 4: Easy Demolding Thanks to Non-Stick Silicone Surface
Once baking finishes, take the chiffon cake mold out and let it cool completely on a wire rack for at least 30 minutes. This cooling step is critical for chiffon cake to hold its shape. When the mold is cool enough to touch, gently squeeze and flip the flexible silicone chiffon cake mold. Its smooth non-stick surface allows the whole cake to slide out effortlessly, with zero residue left stuck on the mold walls. You will get a perfectly defined swirl chiffon cake with crisp decorative edges, no broken pieces or messy surface. After demolding, rinse the oven-safe chiffon cake mold by hand or put it into a dishwasher—its stain-resistant silicone material cleans up within minutes.
Why Choose Heat-Resistant Oven-Safe Silicone Chiffon Cake Mold for Baking
Traditional metal chiffon pans often need thick butter layers to stop sticking and cannot withstand extreme temperature shifts. In contrast, this heat-resistant chiffon cake mold works seamlessly in ovens, freezers and dishwashers. The flexible structure cuts down demolding frustration, while the food-grade silicone guarantees no weird odors transfer to sweet batter. For home bakers who love making chiffon cakes, bundt cakes, mousses and brownies, an oven-safe chiffon cake mold is an essential kitchen tool that simplifies every baking process from batter pouring to final cleanup.
With these four straightforward steps and a premium silicone chiffon cake mold, you can consistently bake light, fluffy, picture-perfect chiffon cakes for family gatherings, birthday parties or daily desserts.