Homemade Caramel Milk Pudding: A Soft Summer Dessert + Why Silicone Molds Are Perfect for This Recipe
Summer calls for cool, silky desserts that balance rich creaminess and sweet caramel flavor, and homemade caramel milk pudding is one of the most accessible treats you can whip up at home. Even if you have zero baking experience, this simple 5-step recipe delivers restaurant-worthy results with just a handful of basic grocery ingredients. Best of all, pairing this pudding with food-grade silicone dessert molds eliminates the biggest headache home cooks face: stuck pudding that breaks when you try to take it out. Today, we will walk through the full DIY caramel milk pudding tutorial, then dive into all the practical benefits of silicone molds that make them a staple for every dessert lover’s kitchen.
What Ingredients Do You Need for Silky Caramel Milk Pudding?
One of the biggest draws of this caramel milk pudding is its ultra-short ingredient list—no fancy specialty supplies required. You can grab everything from regular supermarkets, and the portions below yield enough pudding to fill a set of small silicone dessert molds:
- 500ml whole milk
- 60g white granulated sugar
- 10g gelatin sheets
- 100ml heavy whipping cream
- Crunchy caramel wafer crisps (for topping after setting)
This formula strikes a flawless balance between creamy dairy sweetness and deep caramel notes. The gelatin sheets create a smooth, jiggly texture without the rubbery firmness many cheap puddings have, while heavy cream adds a luxuriously velvety mouthfeel that melts gently on your tongue. Unlike baked custard puddings, this recipe requires no oven—all cooking happens on a stovetop, followed by cold refrigeration, making it ideal for hot summer days when you want to avoid heating up your kitchen.
Step-by-Step DIY Caramel Milk Pudding Tutorial
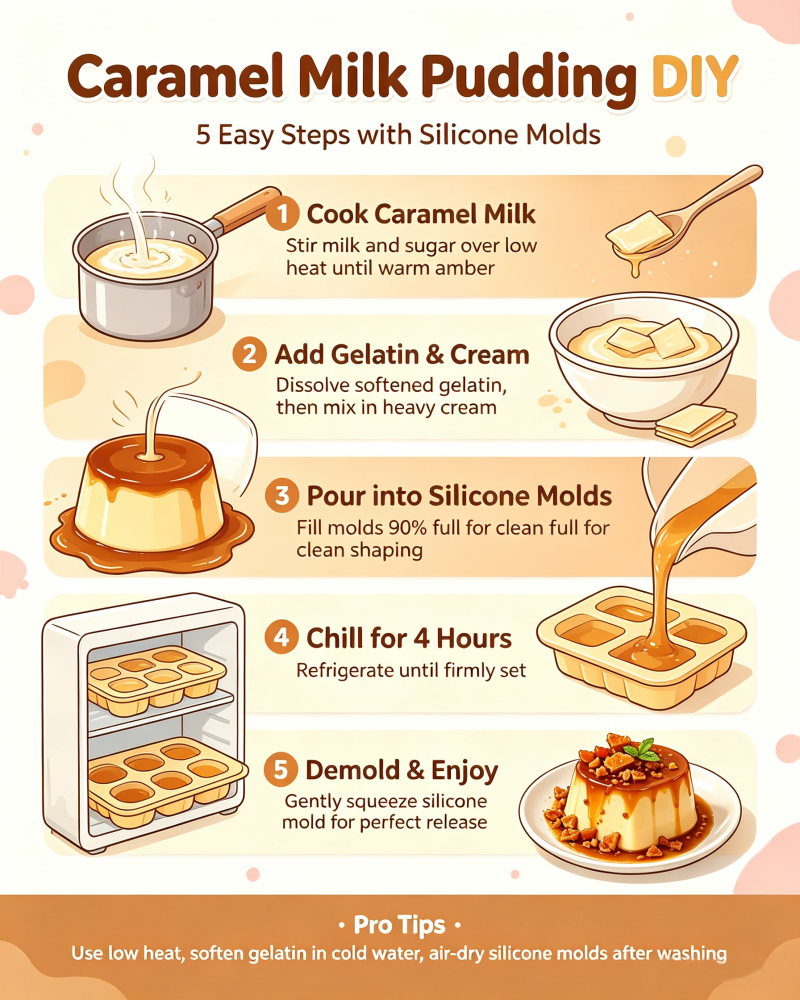
Step 1: Cook the Caramel Milk Base Over Low Heat
Start by pouring all 500ml of whole milk into a small cooking pot, then add your measured white sugar. Turn your stove to the lowest heat setting, and stir continuously with a wooden spatula as the milk warms. Do not walk away during this step—high heat will scorch the milk and create bitter burnt bits that ruin your pudding’s flavor. Keep stirring slowly until the sugar fully dissolves and the mixture deepens into a warm, amber chestnut caramel shade. This slow simmer unlocks a rich, toasty caramel aroma that will fill your entire kitchen within minutes.
Step 2: Mix in Gelatin Sheets and Heavy Cream
Once your caramel milk reaches the perfect warm amber tone, turn off the stove’s heat. Take your gelatin sheets, which you pre-soaked and drained in cold water to soften them, and add them directly to the warm caramel milk. Stir firmly until every gelatin sheet dissolves completely with no lumps left. Next, pour in the full 100ml of heavy whipping cream, and stir again to blend all components into one smooth, uniform liquid. The warm residual heat of the caramel mixture melts the gelatin evenly, which guarantees a silky, lump-free pudding texture later on.
Step 3: Pour the Mixture Into Food-Grade Silicone Molds
Now comes the critical step where silicone molds outperform every metal, ceramic, and plastic alternative: pouring your warm pudding liquid into individual silicone dessert molds. Place your silicone molds on a flat baking tray for easy transport to the fridge, then slowly ladle the caramel cream mixture into each cavity. Fill each mold about 90% full—leave a tiny gap at the top to avoid overflow as the liquid settles.
Traditional ceramic ramekins and metal tins often trap sticky pudding against their rigid surfaces, forcing you to scrape and pry at the dessert to release it, which cracks the smooth pudding shape and ruins presentation. Silicone molds solve this issue entirely with their flexible, non-stick surface, which we will cover in detail in our mold advantage section below.
Step 4: Chill the Pudding in the Refrigerator to Fully Set
Carry the tray of filled silicone molds carefully into your refrigerator, and leave them to chill for a minimum of 4 full hours. For the creamiest, most stable texture, we recommend letting them rest overnight. The low cool temperature activates the gelatin, allowing the liquid caramel cream to solidify into a jiggly, firm pudding that holds its shape perfectly once removed from the silicone mold. A quick pro tip: keep the fridge temperature consistent, and avoid opening the door repeatedly during the setting process to prevent temperature fluctuations that can create uneven texture.
Step 5: Demold, Top With Caramel Crisps, and Enjoy Your Summer Dessert
After 4+ hours of refrigeration, your caramel milk pudding is fully set and ready to eat. This is where the easy-release magic of silicone molds shines brightest. Simply gently push upward on the bottom and sides of each flexible silicone cavity, and the intact, smooth pudding will pop free in one clean piece—no broken edges, no sticky residue left behind in the mold.
Transfer each caramel pudding onto a small serving plate, then sprinkle crunchy caramel wafer crisps over the top for extra texture contrast. The soft, silky pudding pairs beautifully with the crisp, sweet caramel shards, amplifying the rich milk and caramel flavor in every single bite. The finished dessert boasts a light milky aroma balanced with deep caramel warmth, making it ideal for afternoon tea, post-dinner treats, summer picnic snacks, and kid-friendly homemade desserts.
Top Advantages of Using Silicone Molds for Homemade Pudding & Desserts
As we highlighted throughout the recipe, silicone molds are the ultimate tool for crafting perfect caramel milk pudding, and they deliver lasting benefits for all types of homemade desserts, from jellies and custards to chocolate, gummy candies, and mini cakes. Below are their most valuable perks for home dessert makers:
-
Effortless Easy Release, No Sticking or Broken DessertsThe biggest pain point of rigid ceramic, metal, and plastic molds is stuck food that cracks or crumbles during demolding. Food-grade silicone is naturally non-stick and ultra-flexible. When your pudding, jelly, or chocolate sets, you only need to gently squeeze the sides and base of the silicone cavity, and the whole dessert slides out perfectly intact with zero residue left inside the mold. You will never waste a beautiful caramel pudding due to messy, broken shapes again.
-
Safe Food-Grade Material, Temperature Resistant for All UsesHigh-quality dessert silicone molds are BPA-free, odorless, and non-toxic, safe for direct contact with all edible ingredients like dairy, sugar, fruit puree, and chocolate. They feature extreme temperature tolerance, ranging from freezing cold fridge temperatures down to -40°F up to oven heat as high as 446°F. This means you can use the exact same silicone molds for cold chilled puddings, baked mini cakes, frozen fruit pops, and handmade chocolate truffles, without worrying about chemical leaching or mold warping.
-
Stackable, Space-Saving & Portable StorageSilicone pudding molds feature flat, uniform lids and tray bodies that stack neatly on top of one another inside your refrigerator, pantry, or kitchen cabinet. Unlike bulky ceramic ramekins that take up massive shelf space, multiple silicone trays stack vertically to cut down on storage clutter. Many silicone mold designs also include a small hanging hole at one corner, letting you hang them from kitchen hooks to air-dry completely after washing and save counter space when not in use.
-
Simple, Low-Effort CleaningSilicone’s smooth, seamless surface repels sticky food residues like caramel, dairy cream, and chocolate. Once you finish demolding your pudding, you only need to rinse the mold quickly under running warm water, and all leftover cream or syrup washes away instantly with no scrubbing required. Most silicone dessert molds are fully dishwasher-safe as well, cutting down your post-dessert cleanup time drastically. Unlike porous plastic molds that absorb food odors and stains over time, silicone resists lingering caramel and dairy smells, staying fresh after hundreds of repeated uses.
-
Ultra Versatile for All Kinds of Homemade TreatsYour silicone pudding molds are not limited to caramel milk pudding alone! You can reuse the exact same trays to make fruit jelly, coffee panna cotta, homemade gummy candy, chocolate truffles, baby fruit puree snacks, wax melts, and even small handmade soap. This multi-use functionality makes silicone molds an affordable, long-lasting kitchen investment compared to single-use rigid baking tins that only work for one dessert type.
Pro Tips to Master Perfect Caramel Milk Pudding Every Time
Before you start your DIY summer dessert project, keep these simple expert tips in mind to avoid common beginner mistakes:
- Always cook the caramel milk base on low heat with constant stirring. High heat burns the milk and creates a bitter, unpleasant aftertaste that cannot be fixed.
- Soften gelatin sheets in cold water only—hot water will melt them prematurely and ruin the pudding’s setting power.
- For a sweeter flavor profile, you can add an extra 10–15g of white sugar to the milk base while simmering.
- Let the pudding chill for a full 4 hours minimum; rushed short refrigeration time results in soft, runny pudding that will not hold its shape during demolding.
- After washing your silicone molds, hang them up via the built-in hanging hole to air-dry fully before storage, which prevents mildew or lingering damp odors.
Wrap-Up
This no-bake caramel milk pudding is the ideal light, cool treat to beat summer heat, with an uncomplicated recipe that guarantees success for brand-new home cooks. While high-quality ingredients lay the foundation for silky, flavorful pudding, silicone dessert molds elevate the entire creation process by eliminating demolding frustrations, saving storage space, simplifying cleanup, and working for dozens of different homemade desserts.
Whether you are prepping a small after-school snack for kids, planning elegant afternoon tea desserts for guests, or packing portable sweet treats for outdoor summer picnics, this caramel pudding recipe paired with flexible easy-release silicone molds is a reliable, delicious combination you will return to all season long. Grab your milk, gelatin sheets, and silicone molds this weekend, and try this warm caramel-flavored cold dessert for yourself—every spoonful delivers smooth, milky sweetness and satisfying crunchy caramel topping for pure summer comfort.