Hey my lovely home‑baking besties, are you on the hunt for a warm, melt‑in‑your‑mouth sweet snack that you can whip up right inside your cozy kitchen? Today I am thrilled to share my fool‑proof homemade dorayaki recipe, and trust me, even complete baking newbies can nail perfectly fluffy, tender little pancakes on the very first try.
I have spent weeks tweaking my home‑made dorayaki formula, testing different oil choices, flour types and cooking heat settings, until I landed on this ultra‑simple ingredient lineup that calls for nothing fancy or hard‑to‑source bakery supplies. There is zero complicated equipment required, no stand‑up electric mixer, no specialty baking moulds. All you need is a regular non‑stick frying pan, basic mixing bowls, and five everyday pantry staples. Let’s walk through our ingredient checklist first.
Our measured‑out ingredients contain 100‑gram low‑gluten flour, 100 millilitres of fresh whole milk, one whole fresh chicken egg, 13 grams of fine white granulated sugar and 30 grams of smooth coconut oil. I absolutely love using coconut oil in my homemade pancake batter, as it brings a faint tropical creamy aroma without overpowering the soft, milky flavour of our dorayaki. If coconut oil is not your preference at home, you are welcome to swap it out for melted unsalted butter, and your pancakes will still turn out wonderfully soft. I recommend separating your egg into bright egg‑yolk and thick egg‑white early on, since these two parts will be prepared in separate mixing steps, and this separation is the number‑one secret for getting that signature pillowy, airy texture.
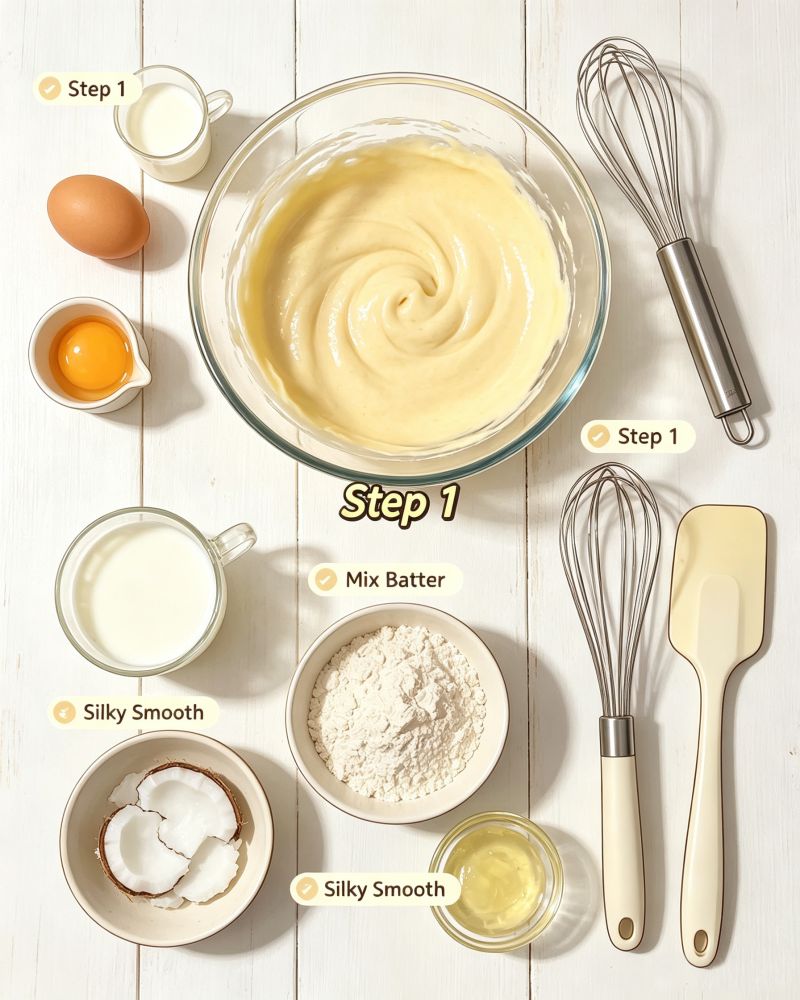
Now let’s kick‑off our step‑by‑step baking workflow, and I will break every single action down for my fellow home‑snack lovers. Grab one clean large‑sized mixing bowl and pour in your whole milk, runny egg yolk, pre‑weighed low‑gluten flour and melted coconut oil. Grab your hand whisk and stir everything slowly and thoroughly until your batter turns silky‑smooth and lump‑free. Never rush your stirring stage; leftover tiny flour lumps will create bumpy, uneven pancake surfaces later on, and we want our golden dorayaki circles sleek and flawless. Once your yolk batter reaches a uniform runny texture, set this bowl aside on your kitchen counter for a moment, and move on to whipping your egg‑white.
This is my favourite home‑baking trick. Place your cold egg‑white into another grease‑free dry mixing bowl, and add your 13‑gram granulated sugar in three separate additions as you whip. I like to stir‑in one‑third of my sugar the second I start beating the egg‑white, the second portion once soft froth bubbles show up, and the final batch when thick white foam has covered the whole bowl. Keep on whisking until your stiff egg‑white peaks can hold a sharp tiny point when you lift your whisk out of the mixture. This stiff‑peak meringue is what traps air inside our batter, stopping our finished dorayaki from turning flat, dense and rubbery. Do not skip this crucial whipping stage if you crave light, cloud‑like pancakes.
Next comes our gentle folding mixing process, and please remember never to stir aggressively. Scoop one big helping of your fluffy beaten egg‑white and tip it into your smooth egg‑yolk batter. Use a silicone spatula to fold the batter from the bowl’s bottom up to the top, turning and blending slowly to preserve all the precious air bubbles trapped in the meringue. Once this first scoop is well‑combined, fold in the rest of your whipped egg‑white in batches. Every soft fold keeps our batter aerated, and harsh circular stirring will pop every air bubble and ruin our dreamy fluffy texture. When you finish mixing, your finished pancake batter will be thick, glossy and slow‑flowing.
Time to head over to your stovetop and grab your everyday flat‑bottom frying pan. Keep your stove heat on the absolute lowest small‑fire setting, because high heat will burn the outer pancake surface while the inside stays raw and under‑cooked. Spoon suitable‑sized dollops of batter onto your ungreased non‑stick pan, and wait patiently for tiny air‑bubbles to pop up all over the top face of each pancake. Once those little bubbles break on the surface, carefully flip every round pancake over with your spatula. Each cooking side only needs around one minute on low heat. Keep a close eye on the golden‑brown colour, and lift your dorayaki off the pan once both sides carry that warm honey‑gold shade.
As you finish cooking every batch of soft pancakes, lay them out on your dinner plate and let them cool down for several minutes. This cooling‑off stage helps the pancake texture settle down, and the outer skin will stay tender instead of drying out fast. Now we get to the fun home‑styling and decoration part! I love stacking two fluffy circular pancakes together for the classic dorayaki sandwich shape, dust fine powdered sugar all over the top surface, and drizzle rich dark chocolate sauce in a criss‑cross lattice pattern. That gorgeous chocolate web decoration looks so aesthetic for home food photos, and the sweet bitter chocolate balances out the mild milky sweetness of our soft pancakes perfectly.
Making homemade dorayaki has become my go‑to relaxing weekend kitchen ritual, and I truly recommend this easy snack for every home‑cooking enthusiast. This treat works wonderfully as a leisurely morning breakfast, an after‑work sweet pick‑me‑up, a kid‑friendly after‑school snack or a lovely little dessert for casual house gatherings. The whole cooking workflow takes less than 30 minutes from ingredient prep all the way to plated finished snacks, and you can customise your dorayaki endlessly according to your own home pantry. Swap chocolate drizzle for red bean paste, honey, fruit jam, whipped cream or sliced fresh berries whenever you feel like switching‑up your flavour profile.
Many new home bakers get nervous when they attempt aerated pancake recipes, yet this dorayaki formula is extremely forgiving. The only major rules you must stick to are keeping your egg‑white stiff‑peaked, folding batter gently and sticking to low‑temperature pan‑frying. Once you master those three simple home‑baking habits, you will churn‑out restaurant‑quality fluffy Japanese‑style pancakes time and time again.
There is nothing quite as satisfying as pulling warm, sweet homemade snacks from your very own kitchen, and simple comfort food like these dorayaki always make ordinary days feel warm and special. Grab your mixing bowls, gather up those cheap everyday ingredients and give this easy recipe a go today. I hope your home kitchen fills with lovely sweet coconut and baked pancake aroma, and you enjoy every bite of your pillowy, chocolate‑drizzled homemade dorayaki.