1. Full Ingredients List
1.1 Crispy Cookie Base
80g low-gluten flour, 30g powdered sugar, 45g unsalted butter, 25g whole egg liquid, 15g heavy cream, 1g fine salt
1.2 Semi-Liquid Caramel Filling
60g granulated sugar, 20g purified water, 80g room-temperature heavy cream, 15g unsalted butter, 1g sea salt
1.3 Gianduja Milk Chocolate Mousse
120g Gianduja milk chocolate, 180g heavy cream (for whipping), 30g egg yolk, 15g granulated sugar, 5g gelatin sheets, 10ml pure milk
1.4 Milk Chocolate Glaze
100g milk chocolate, 60g whipping cream, 10g unsalted butter, 5g glucose syrup
2. Required Professional Tools
Silicone baking mat, silicone spatula, silicone smoothing spatula, hemispherical silicone mold, circular cookie cutter, oven, freezer, fine sieve, cooking thermometer, mixing bowls.
3. Detailed Production Steps
3.1 Make the Crispy Cookie Base
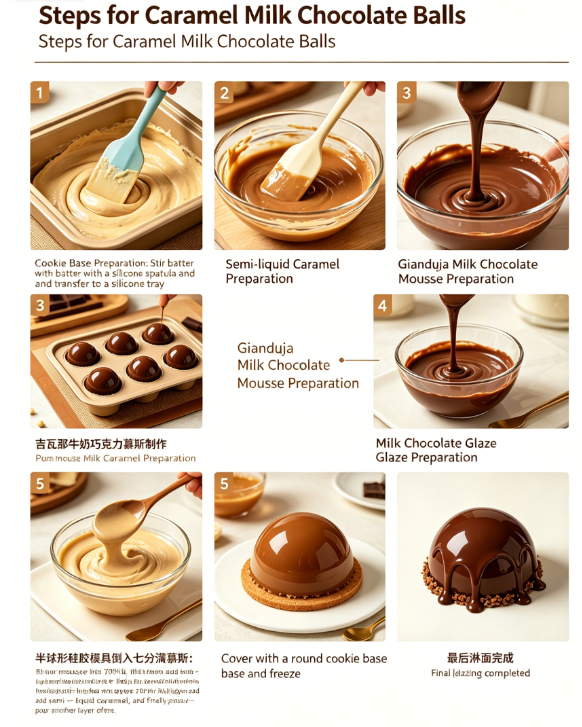
First, soften the unsalted butter at room temperature until it can be pressed flat, add powdered sugar and fine salt, and stir gently with a silicone spatula until the mixture is smooth and no lumps remain. Pour in the whole egg liquid in two batches, stirring evenly with a silicone spatula after each addition to avoid water-oil separation. Then add fresh cream and mix well. Sift the low-gluten flour into the butter mixture through a fine sieve, and use the silicone spatula to perform cutting and folding motions until a smooth, fine batter is formed; do not over-stir to prevent the base from becoming hard after baking.
Lay the prepared silicone baking mat flat on the baking tray, pour the batter onto the mat, and spread it into an even thin layer with a silicone spatula. Preheat the oven to 160°C, put the baking tray into the oven, and bake for 12 to 15 minutes until the surface is golden and crisp. After taking it out and cooling completely, use a circular cookie cutter to cut out neat round cookie bases of the same size as the mold diameter, and set aside for later assembly.
3.2 Make the Semi-Liquid Caramel Filling
Put granulated sugar and purified water into a small thick-bottomed pot, heat over low heat without stirring, and shake the pot slightly to make the sugar melt evenly. Heat until the sugar liquid turns amber and emits a rich caramel aroma, then turn off the heat immediately. Slowly pour the room-temperature heavy cream into the caramel liquid in batches, and stir continuously with a silicone spatula. The mixture will bubble violently during this process, so keep a safe distance. After the bubbles subside, add unsalted butter and sea salt, stir until completely melted and integrated, then heat for another 1 minute over low heat to remove excess water.
Filter the caramel liquid through a fine sieve to remove impurities and undissolved sugar lumps, pour it into a small container, and let it cool to room temperature, then refrigerate for 20 minutes to obtain a smooth, fluid semi-liquid caramel filling with moderate consistency, which is convenient for subsequent filling.
3.3 Make the Gianduja Milk Chocolate Mousse
Soak the gelatin sheets in cold water until soft, then squeeze out excess water and set aside. Chop the Gianduja milk chocolate into fine pieces, heat it with insulated warm water (temperature controlled at 45°C) until completely melted, and keep the chocolate liquid warm. Whisk egg yolk and granulated sugar in a bowl until the mixture turns pale yellow and fluffy, add warm pure milk and softened gelatin, and stir evenly.
Mix the egg mixture with the melted Gianduja chocolate, and stir smoothly with a silicone spatula. Whip the chilled heavy cream to a 60% soft peak state (flowable and thick), take one-third of the whipped cream and add it to the chocolate base to dilute and mix, then pour back into the remaining whipped cream, and fold gently with a silicone spatula until no white streaks remain. The finished mousse is delicate, light and stable in shape.
3.4 Make the Milk Chocolate Glaze
Chop the milk chocolate finely and set aside. Heat the whipping cream and glucose syrup in a small pot until slight boiling, then pour it over the chopped chocolate, let it stand for 3 minutes to fully melt the chocolate. Add unsalted butter, and stir gently with a silicone spatula until all ingredients are fully fused and the glaze is smooth and glossy. Filter the glaze through a fine sieve and let it cool to 32–35°C for later use; this temperature ensures a smooth hanging glaze effect without flowing too fast.
4. Professional Dessert Assembly & Finishing
Pour the prepared Gianduja milk chocolate mousse into the hemispherical silicone molds, filling each mold 70% full. Gently shake the mold up and down to release internal air bubbles, then put the mold into the refrigerator and chill for 40 minutes until the mousse is initially set and not easy to flow. Take out the semi-set mousse mold, pour an appropriate amount of semi-liquid caramel into the center of each mousse ball as the inner filling.
Fill the mold with the remaining mousse, and smooth the opening and surface with a silicone smoothing spatula to ensure the mousse fits the mold perfectly without gaps or unevenness. Take the pre-made round crispy cookie bases, fit them tightly on the opening of each mold to seal the mousse, then put the entire mold into the freezer for more than 2 hours until the mousse balls are completely frozen and shaped.
After fully freezing, demold the chocolate mousse balls gently. Place the frozen spherical desserts on a baking rack, steadily pour the warm milk chocolate glaze evenly over the surface of each ball. The glaze will quickly hang and form a thin, bright uniform coating. After the glaze is completely set, this elegant, romantic and delicate French Michelin three-star caramel milk chocolate ball is completed, with distinct layers and pure and rich taste.